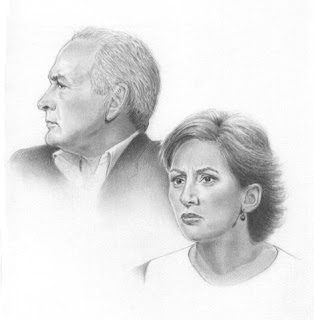
TV sketch in progress

I think of my other blog, Felicity's Philosophies as the 'why' - why I choose the subjects I do - and this blog as the 'how' - more focused on the materials I use and how. So what better way to start the year than with a 'how to'. More for myself, to be honest, as I have a terrible memory and I forget how I achieved certain effects when I look at old drawings!
So, above, the finished sketch of Alastair Stewart and Saira Khan drawn from Celebrity Mastermind. And below, step one, just getting the outline down lightly on paper. I used an HB pencil to start (Faber Castell) and I draw in a rectangular (6"x8") Winsor & Newton journal which has, I think, 120gsm cartridge paper.

When I'm happy with the proportions I darken the eyes and darken and tidy up the lines a bit.

Next I add some shading - I think of shading at this stage as checking proportions, adding blocks and looking at them as pieces of a jigsaw puzzle, checking the distance between them and their relationship to each other. This is the first stage of laying down some pencil lines - hatching rather than cross hatching as the results are smoother...

and here is the same drawing but smudging the pencil marks with a tortillon. It makes the pencil look lighter (in the darker areas) so I carry on layering more pencil and smudging it to get the values I want. I've switched to a 2B and at the end I added a 4B to get the darkness I needed in her hair.

Here is the one I used, but I use smaller ones too for areas like the eyes and nose if I need greater control. Once the tortillon is black, like it is in the photo, it can be used on it's own to add details or shading. I used it on the edges of the hair to create a wispy, out of focus look.

I use a Staedtler Mar Plastic eraser as it works best on this type of paper but also a battery powered Jakar eraser in parts (photo here) as it's very handy for putting highlights in hair or re-directing the way the hair flows. Before I had one of these erasers, I used to leave the highlights white and work around them but it was much less flowing and spontaneous, quite a laborious process. I brought her hair in closer to make her neck look slimmer as she was looking a bit stout! I also brought the shading down from his jacket to frame her face in order to get rid of that heavy outline and add some light around her hair for interest. This stage shows quite clearly the lines I created in her hair with the eraser before I've softened them.

I've included the finished drawing again, below, as it shows how I changed his neck - it looked too heavy - and changed the line of his jacket at the back as it was too straight. I also changed the line of his shirt a little as his neck seems to end too close to his body and looked rather odd! I lightened the shading on his nose as it looked a little dark in relation to the rest of his face.


Comments
Best regards,
Carolina
your steps. These are so detailed, you must
have tremendous patience.
Lets see some more.