Julia Sawahla - WIP
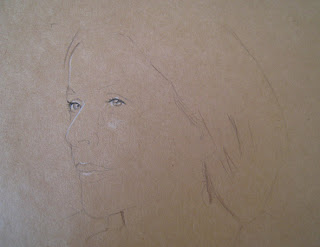
I thought it would be fun to post another work in progress but this time right from the beginning. I've taken photos rather than scans as this is much quicker for me (my new-ish laptop doesn't work with the old scanner) but hopefully the quality is good enough to see the details and colours. Normally I write words under the photos I'm describing but after I publish I seem to have huge gaps between the words and photos and I haven't been able to sort that out. So, the first stage, below, is where I've done the outline and indicated the lightest lights with a white Luminance pencil and the eyelashes and pupils with black. The graphite outline will smudge and grey the colours so I rub it out just enough so I can see it and then replace it with the relevant colour, in this case I indicated the hair in brown.
Next I used Polychromos Light Flesh to indicate the next lightest value and blend in with the white.

Next, Light and Medium Flesh all over and then blending it with a tissue wrapped around my finger. This takes off most of it but leaves a residue in the paper to build on again so this process might be repeated a couple of times. It makes a nice smooth base to build on. Although I must say it tends to work better on white paper than this very smooth brown stuff.

The colours look too pink and the face inspired me because it has such a wonderful warm orange glow, so I try out other colours. I don't have a plan, I just see how things look and take them off with a tissue if I don't like them. Here I'm trying Cinnamon and I think Burnt Ochre Lyra pencils and indicating some darks in the hair with Light Sepia (Polychromos). I put some of the warm tones in the hair too so hopefully it will create a glow later.

Building up layers of skin tone, restating some highlights. Using some Venetian red, one of my favourite skin tone colours, to tone down the pink and deepen the shadows.

This Polychromos Burnt Ochre pencil is quite soft so I put a layer over the whole face and into the hair to give it a nice warm glow.

Out comes the black - that always makes a huge difference but I have to resist the urge to use it too soon! It's used very lightly here in the face but more heavily to create the hairline. I put more Venitian Red in the skin around the temples and use it to blur the edge of the hairline - and blend it into the hair too. Constant layering of the other colours already used with the addition of some Light Carmine on the lips. Another favourite colour Warm Slate Grey (Lyra) added around the jawline and a touch under the eyes.

One colour always 'makes' the portrait and it's different every time, I'm always looking out for it. Here it was Burnt Ochre but I also discovered a great effect when I used the Light Sepia pencil on it's side and put down a layer. It seemed to have a messy hair effect and as I had worried how I was going to do the hair, I decided when I saw this to keep it very sketchy and loose. Overall, I'm really pleased with this - I just wish I had this paper in a larger size as this is crammed into a tiny 6"x8" sketchbook!

When I tried blending that brown, it almost smudged right off. In fact, the pencils act more like pastels on this paper, but it's an effect I quite like. In the finished drawing, I used a touch of Apple Green and Emerald green in her clothes and Sky Blue (all Lyra) for the background (see next post).


Comments
Sigrid, I have tried the blender but I find it waxy. I just used a tissue here, but on white paper I also use a paper tortillon. This brown paper doesn't take many layers before the surface breaks up so I try to keep them to a minimum.
You do such a fine job on portraits!
Love this portrait series.